| Topic: | Programming |
| Level: | Advanced |
| Intended Audience: | Architect and Developer |
Welcome back. This is part two of my series on creating a SharePoint 2013 Timer job. Specifically I am going to cover the high-trust provider-hosted app project inside of Visual Studio. And, how to configure this app to use a App Only policy. So this part of the series is a little more tailored towards the developer and not so much the admin / IT professional.
I will warn that these instructions are really meant for a Development or Test server type scenario. For Production there are several changes that I am hoping common sense would dictate you change. For example, you would not use a password of password in a Production environment. Nor would you store your .PFX on the local machine you are doing development on. Use your own discretion and work closely with your admins / IT professionals in a Production scenario.
A high-trust app is a provider-hosted app that uses digital certificates to establish trust between the remote web application (your app server) and SharePoint (your SharePoint server). The high-trust app can take over the identity of any user without knowing the user's password. SharePoint will then allow the app to work on the behalf of that user. This does not imply that the app can take over an administrator's account and have access to everything they have. The app has a specific manifest file that dictates the permissions it has. And, the user has to be okay with this when the app is being instantiated inside of SharePoint. So it is not a full fledged take over of that user's account.
I will warn that these instructions are really meant for a Development or Test server type scenario. For Production there are several changes that I am hoping common sense would dictate you change. For example, you would not use a password of password in a Production environment. Nor would you store your .PFX on the local machine you are doing development on. Use your own discretion and work closely with your admins / IT professionals in a Production scenario.
So what is the difference between high, low, and full trust?
A high-trust app is a provider-hosted app that uses digital certificates to establish trust between the remote web application (your app server) and SharePoint (your SharePoint server). The high-trust app can take over the identity of any user without knowing the user's password. SharePoint will then allow the app to work on the behalf of that user. This does not imply that the app can take over an administrator's account and have access to everything they have. The app has a specific manifest file that dictates the permissions it has. And, the user has to be okay with this when the app is being instantiated inside of SharePoint. So it is not a full fledged take over of that user's account.
Now, a high-trust application is not the same as a full-trust solution. A high-trust app must still make app permission requests as I explained. The full-trust solution scenario has the same permissions as the SharePoint environment itself. Meaning that the solution is installed and ran on the SharePoint server itself like you used to do in SharePoint 2010 (e.g., good ole WSP packages). The high-trust app should be installed on it's own isolated server and not on the SharePoint server itself.
A low-trust app uses a trust broker, such as Microsoft Azure Access Control Services (ACS), to act as a token issurer between SharePoint and the application. Low-trust applications can not "impersonate" or do actions on the behalf of other users like a high-trust application can. The low-trust app uses it's own app identity when communicating with the server and when requesting a token. This makes low-trust a great option for Office 365. It should also be noted that this low-trust scenario utilizes OAuth.
What are app authorization policies?
SharePoint has three types of authorization policies. User-only, User and App, and App-only.
The user-only policy is the policy that was always applied in SharePoint 2010. This policy takes into account only the user identity. In example, when a user is accessing resources directly without using an app at all they are using the user-only policy for authorization checks.
The user and app policy takes into account both the user identity and the app identity. When authorization is occurring this policy checks to see if both the current user and the app have permission to perform the action being requested. This is useful when the app does not run on the SharePoint server and whats to act on the behalf of the user to get access to the user's specific resources.
The app-only policy only takes into account the app identity. When authorization occurs SharePoint checks to see if the app has permission to perform the action in question regardless of what access the current user or any user might have. In example, the person who installs the app has the rights that the app needs and gives permission for the app to perform those actions for users even though those users might not have permission themselves to directly act. I should note that certain APIs require user context. Thus, they can not be executed with an app-only policy alone. For example, there are many APIs for interacting with Project Server 2013 and for performing search that an app-only policy may not be the appropriate policy choice for your app.
Setting Up Your Solution in Visual Studio 2013
These next steps assume that you have successfully completed the steps found in my previous article of this series.- Open Visual Studio 2013 and click on Start | New Project... or File | New | Project....
- Select the App for SharePoint option under the Office/SharePoint menu.

- You will be asked to specify a site that you want to use for debugging your app. This is a site collection that is using the Developer Site template. You can have your administrator do this by going through Central Administration | Application Management | Create site collections. If you have already done this point the wizard to that location. Also make sure that Provider-hosted is selected. Click Next.

- Specify the ASP.NET Web Forms Application as the type of project you want to create.

- On the Configure authentication settings screen you will select the Use a certificate (for SharePoint on-premises apps using high-trust) option. In the appropriate fields you will enter some of the settings set from the previous blog article:
Certificate location: C:\Certs\HighTrustApps.pfx
Password: password
Issuer ID: You can open the .CER file in C:\Certs and use the Issued By name.
- Click Finish.
You have just created your first high-trust provider-hosted app! You will need to configure SharePoint 2013 to use the certificate and configure it to trust your app. Again, I warn that this instruction is really only for Development purposes. To package and publish high-trust apps for SharePoint 2013 in Production read this article instead.
Enter the following PowerShell commands:
$publicCertPath = "C:\Certs\HighTrustAppsCert.cer"
$certificate = New-Object System.Security.Cryptography.X509Certificates.X509Certificate2($publicCertPath)
New-SPTrustedRootAuthority -Name "HighTrustAppsCert" -Certificate $certificate
$realm = Get-SPAuthenticationRealm
$certificate = New-Object System.Security.Cryptography.X509Certificates.X509Certificate2($publicCertPath)
New-SPTrustedRootAuthority -Name "HighTrustAppsCert" -Certificate $certificate
$realm = Get-SPAuthenticationRealm
Next, you need to run this command. Your app will use an access token to get access to SharePoint data. This must be issued by a token issuer that SharePoint trusts. In this case, and for all high-trust apps, the certificate IS the token issuer. This command constructs an issuer ID in the format that SharePoint requires:
$specificIssuerId = "I used my Issued By name here"
$fullIssuerIdentifier = $specificIssuerId + '@' + $realm
$fullIssuerIdentifier = $specificIssuerId + '@' + $realm
In Production the $specificIssuerId must be a GUID because in Production each certificate must have a unique issuer. However, for development purposes you can hard code the value in like I have done.
Continue you along by entering the following:
New-SPTrustedSecurityTokenIssuer -Name "High Trust Apps Cert" -Certificate $certificate -RegisteredIssuerName $fullIssuerIdentifier -IsTrustBroker
The following commands are only ran in the Development scenario. If you do not run this you will get 403 Forbidden errors.
$serviceConfig = Get-SPSecurityTokenServiceConfig
$serviceConfig.AllowOAuthOverHttp = $true
$serviceConfig.Update()
$serviceConfig.AllowOAuthOverHttp = $true
$serviceConfig.Update()
You can save all of those commands into a file called HighTrustConfig-ForDebugOnly.ps1 and later run it again using the ./HighTrustConfig-ForDebugOnly.ps1 command inside the SharePoint Management Shell.
Test your application inside of Visual Studio by hitting your F5 key. If you are presented with the following messages...


...just click Yes and continue.
You should then see a web page being hosted by localhost (Visual Studio in this case via virtual directory) that contains the name of your Developer Site.
Congratulations! You should see a blank screen with the title of the SharePoint site you are running this app against. If everything is successful, continue now with the instructions on making your app use an App Only policy.
The first step is adding the AllowAppOnlyPolicy to the app's manifest. In Visual Studio this is found under the App Project. You will see two files initially. An AppIcon.png and a AppManifest.xml. You want to open the code for the app's manifest.
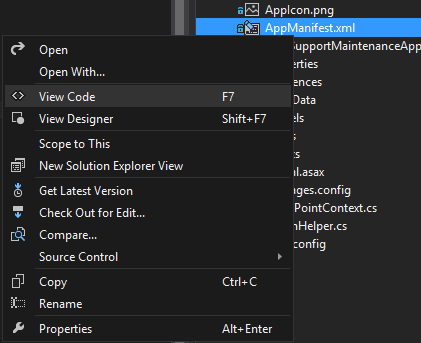
You will add the following code directly above the </app> closing tag.
<AppPermissionRequests AllowAppOnlyPolicy="true" >
<AppPermissionRequest Scope="http://sharepoint/content/sitecollection/web/list" Right="Read" >
<Property Name="BaseTemplateId" Value="101" />
</AppPermissionRequest>
</AppPermissionRequests>
Or you can do this through the GUI just by double-clicking on AppManifest.xml. Then go to the Permissions tab.

NOTE: The BaseTemplateId property you see listed in the example really applies to Lists. If the identifier is not set it means your app will have that permission level on all types of Lists. The 101 listed there means, for example, that the app only has Read to Document Libraries. You can view the full list by visiting http://msdn.microsoft.com/en-us/library/office/ms415091(v=office.15).aspx and looking at the Type attribute.
Last, but not least, how do you use the TokenHelper to utilize the S2S protocol? Open your TokenHelper.cs file in the AppWeb part of the Visual Studio project to look at some of the code there. Specifically take a look at the GetS2SAccessTokenWithWindowsIdentity and the GetClientContextWithAccessToken methods. In your application you would pass a null for the WindowsIdentity parameter to get back a valid OAuth access token
string appOnlyAccessToken = TokenHelper.GetS2SAccessTokenWithWindowsIdentity(_hostWeb, null);
You can then obtain the Client Side Object Model (CSOM) client context to perform actions on the behalf of the user.
using (ClientContext clientContext =
    TokenHelper.GetClientContextWithAccessToken (_hostWeb.ToString(), appOnlyAccessToken))
{
    List list = clientContext.Web.Lists.GetByTitle("Announcements");
    ListItemCreationInformation info = new ListItemCreationInformation();
    Microsoft.SharePoint.Client.ListItem item = list.AddItem(info):
    item["Title"] = "Created via CSOM";
    item["Body"] = "Created via CSOM on " + DateTime.Now.ToLongTimeString();

    item.Update();
    clientContext.Load(item);
    clientContext.ExecuteQuery();
}
Then to test just deploy your app and log on as a user who only has read permissions to the list. Execute the code and a new item will be created using the application's permissions. If you had included a user identity instead of a null you would see a message stating "...by Application on behalf of User".
In my next article I will explain the process of creating a Windows Service solution that will be used to handle the timing / schedule part of our application.
Sources:
http://msdn.microsoft.com/en-us/library/office/dn268593(v=office.15).aspx