Friday, November 27, 2015

Deer Rubs Explained

I hope everyone had a good Thanksgiving. In continuation of my hunting posts I have decided to explain buck rubs in a little more detail.


Rubs are great for gathering information about those big bruisers (you hope) that are hanging out in your hunting area. Rubs serve two primary functions for deer. First is to help rub off velvet from their new set of antlers. Normally this happens earlier in the season, late September and early October in most places, and seasoned hunters know that these marks are not necessary territorial. They are generally just good for the deer for getting that velvet off.

Second, bucks have forehead glands which they use as territorial markers for other deer. Rubbing is one way that these bucks mark their territory for other bucks in the area. Field & Stream has a good article on deer glands.

I really enjoy seeing rubs, especially big ones. As the season progresses you can really being to estimate the size of a deer based on the diameter of the trees being rubbed and the larger length of the antler marks. A little forkhorn buck is not going to rub a huge tree but may hit small saplings. A 10+ with a heavy rack will definitely hit a big tree. When you find a rub on a tree and the tree is at least 6 inches in diameter, chances are it is a big buck hitting it.

Bucks tend to rub trees in the same area one year to the next. It is not uncommon for them to rub the same tree. As long as that buck is still alive you actually have pretty good chances of being able to ambush him when he comes back to refresh the rub.

I would not pay too much attention to the rubs until the third week of November, when activity picks up again from velvet shedding. This happens when bucks are looking for hot does following the peak of the rut. These new rubs are normally found on the downwind side of thick brush where does like to bed down. So you can plan accordingly.

You can use rubs to pinpoint where bucks eat and sleep as well. The shiny side of the rub facing dense thicket? That is likely where breeding is taking place. The shiny side of the rub faces a food plot? That is probably where he goes to eat.

There are normally several kinds of rubs. Rubs that seem random in your hunting location are an indicator of a buck's home range. A rub line (20 to 30 yards apart each) indicate a common travel path for a buck. I would be careful not to constantly sit on the same rub though as that will quickly let a buck know of your presence. They are smart enough to start avoiding that rub. So rotate out how often you sit that rub. Every 3rd hunting trip is a good way to keep that buck guessing.

That is all for this week. Again, hope you had a great Thanksgiving and I hope you enjoyed the article above.

Tuesday, November 10, 2015

Winter Hunting is Coming

Well, Ned Stark got something right, winter is definitely coming. Especially for us dedicated hunters who will sit all day in the woods or fields. So how do you stay warm when you are determined to bag that big buck? Here are some tips I follow which tend to work well for me staying warm even in single digits.


Core Heat
The human body is itself a fuel combustion engine. Depending on the type of fuel you provide it depends on the quality of heat that engine puts off. For example, if you drink cold liquids the engine cools down. Hot liquids the engine heats up. You do not need me to tell you the obvious.


Some people do not realize though that certain types of solid foods work best in cold weather. Start your hunting day out with whole grains before you leave for your stand or blind. A breakfast with oatmeal is a great way to start filling the fuel tank. You can later snack on high calorie, good fats foods. Such as various types of nuts. Energy bars and granola bars are a good choice too. The digestion process generates heat. Try and stay away from candy bars though.

As I mentioned earlier, hot foods like soup, coffee or hot teas are beneficial. You should also make sure you drink lots of water but try to avoid cold water.


Insulation
We have some pretty cool and high tech clothing options available to us when it comes to keeping warm. With proper layering and using the right fabrics at those different layers you can really do a lot to stay warm (as well as scent controlled).

There have been many times I could not have possibly stayed on the hunt without having proper layering on. Single digits, snow and ice last year would have kept some people at home on their couches in the warm. But not me. As the old saying goes, "You can't shoot one from your sofa.".


Let's talk about the different layers for a moment...

The Base Layer | The Outside Layer | The Middle Layer

Water transfers heat really well. So when you are sweating (which you are always sweating moisture even if you think you are not) you are allowing water vapor to pull heat away from your body very quickly. For your BASE LAYER you should stick with fabrics such as merino wool, polyester and even silk. Avoid cotton. Polyester blends such as nylon, polypropylene, spandex and rayon are good choices as well.

You can wear all the warm layers you want but I can assure you from experience that the wind does cut like a knife. For your OUTER LAYER you should consider windproof fabrics. There are a ton on the market that are silent and comfortable. They are even waterproof while allowing moisture to escape from underneath. Again, love technology.

The best MIDDLE LAYER choices include down, chemically treated down, fleece, wool, and man-made insulators like Thinsulate and PrimaLoft. Your mid-layer should be light and insulating. But, still needs to remain breathable to let moisture escape. Your middle layer is the best place for making adjustments when the weather or situation (long walk vs. short walk, cold morning vs. warm afternoon) calls for it.

No single garment is perfect for every situation so you will need to mix-and-match over the season to adapt to the situation.

Also, do not forget your feet, hands nor head. When your core body temperature drops your body will actually start diverting heat from those regions in an attempt to save the core. So your best defense against cold limbs is to keep your core warm. Wool socks, gloves, and hat are gold. I am a big fan of hand warmers as well.

Conclusion...
So in conclusion I wanted to just say that not every situation is the same. If I have a long walk in warmer weather then my interest turns more into moisture prevention. If I have a short walk in extreme cold then maybe warmer insulation is best and not so much wicking. Also there are a ton of toys on the market. Chemical hand warmers, rechargeable warmers, scentless heaters for your blind, and much more.

Stay warm m'friends.

Monday, November 9, 2015

Meat or Horns? Why not both?

I have been away from my blog for quite some time. I have decided to start blogging again so I could share some of my own thoughts on Google+ and some of the other media sites I am a member of.

So I decided a great topic to start back up with is a hunting related one. Reasonable since we are in the midst of hunting season here in Virginia. I believe I have a cornucopia of friends who hunt. Some only hunt during rifle season, some only on Saturdays so they do not miss out on football on Sunday, and some who only help their buddies out who are hunting (not actually hunting themselves in the common sense of the word) by cutting wood or helping check cameras.

I have found a couple of different camps when it comes to the reason why folks hunt. Some folks hunt to fill their freezers up while some hunt just so they can throw some bones on the wall. I say "Why not both?".

Antlers are never more important than the meat in my opinion. Do not take me wrong. I am not saying I would not love to shoot a big (mileage may vary, big to me vs. big to you) buck so I can get him mounted on my wall. I am just saying I get just as excited when I see a doe walk or any other wild life for that matter.


There are a ton of articles and TV shows that focus on herd management and how to grow the biggest bucks. But, I think you will find that most whitetail hunters who are able to take antlered or antler-less deer during the season are pretty happy getting either. Whether I personally see a buck come in or a doe with her babies in tow, I consider it a good hunting day because I got to come close to the wildlife in our area.

If you are a seasoned hunter who is showing a new hunter the ropes. Do not make the emphasis on getting the biggest buck ever the only goal. I think the new hunter would be in for a sore disappointment with expectations set so high.

In conclusion, my answer for my fellow hunters is that you are not more of a sportsman if you just go out to shoot a big buck. It is possible to feed family AND try for that big buck. So why not both?

Friday, July 11, 2014

PowerShell Script: Add a Trusted Security Token Issuer and Principal Permissions

Topic:Configuration
Level:Advanced
Intended Audience:Administrator, Architect, and IT Professional


If you read my recent post on how to use PowerShell to remove a Trusted Security Token Issuer and Principal Permissions, you will love this post in which I show you have to add a Trusted Security Token Issuer as well as a App Principal Permission.

Just save the following into a .PS1 file. You just need to provide the app display name, Issuer ID (or leave it blank for a random GUID), SSL certificate location, SharePoint site URL, the scope for which the app's principal should be registered (Site, SiteCollection, or SiteSubscription), and the permission that the application should have (Read, Write, Manage, or FullControl). Again, it is that easy.

if((Get-PSSnapin -Name Microsoft.SharePoint.PowerShell -ErrorAction SilentlyContinue) -eq $null)
{
    Add-PsSnapin Microsoft.SharePoint.PowerShell
}

# Stop if there is a problem with this cmdlet
$ErrorActionPreference = "Stop"

# Set our required variables
$appDisplayName = Read-Host "What is your app's display name?"
$issuerID = Read-Host "What is the Issuer ID? Leave blank to auto generate a GUID. Must be unique to the site.”
if ($issuerID -eq "") { $issuerID = [guid]::NewGuid() }
$publicCertPath = Read-Host "Please type in the .CER path location. For example, C:\mycertificate.cer"
$siteUrl = Read-Host "Please type in the SharePoint site URL. For example, https://sp2013.myspsite.com”
$site = Get-SPSite $siteUrl
$appScope = Read-Host "What scope should this application have access too? [Site] [SiteCollection] [SiteSubscription]"
$appPerm = Read-Host "What permission should this application have? [Read] [Write] [Manage] [FullControl]"

# Get our full application identifier
$web = Get-SPWeb $siteUrl
$certificate = Get-PfxCertificate $publicCertPath
$realm = Get-SPAuthenticationRealm -ServiceContext $web.Site
$fullAppIdentifier = $issuerId + '@' + $realm

# Add the trusted root authority, security token issuer, register the app principal, and set app permissions
New-SPTrustedRootAuthority -Name $appDisplayName -Certificate $certificate
New-SPTrustedSecurityTokenIssuer -Name $appDisplayName -Certificate $certificate -RegisteredIssuerName $fullAppIdentifier
Register-SPAppPrincipal -NameIdentifier $fullAppIdentifier -Site $web -DisplayName $appDisplayName
$appPrincipal = Get-SPAppPrincipal -NameIdentifier $fullAppIdentifier -Site $site.RootWeb
Set-SPAppPrincipalPermission -Site $site.RootWeb -AppPrincipal $appPrincipal -Scope $appScope -Right $appPerm

iisreset

PowerShell Script: Remove Trusted Security Token Issuer and Principal Permissions

Topic:Configuration
Level:Advanced
Intended Audience:
Administrator, Architect, and IT Professional

I recently wrote a PowerShell script that can be used to easily remove a Trusted Security Token Issuer as well as any App Principal Permission that has been setup for the SharePoint 2013 on-premise (AKA Provider-Hosted) App. Just save the following into a .PS1 file. You just need to provide the SharePoint site URL, app name, and the scope for which the app's principal was originally registered (Site, SiteCollection, or SiteSubscription). It is that easy.

if((Get-PSSnapin -Name Microsoft.SharePoint.PowerShell -ErrorAction SilentlyContinue) -eq $null)
{
    Add-PsSnapin Microsoft.SharePoint.PowerShell
}

# Stop if there is a problem with this cmdlet
$ErrorActionPreference = "Stop"

# Set our required variables
$siteUrl = Read-Host "Please type in the SharePoint site URL. For example, https://sp2013.myspsite.com”
$site = Get-SPSite $siteUrl
Write-Host ""
Write-Host "SharePoint Apps:"
Get-SPTrustedSecurityTokenIssuer | select Name | fl
$issuerID = Read-Host "What is the app's name?"
$realm = Get-SPAuthenticationRealm
$fullIssuerID = $issuerID + '@' + $realm
$tokenIssuer = Get-SPTrustedSecurityTokenIssuer | Where-Object { $_.RegisteredIssuerName -eq $issuerID }
$appScope = Read-Host "What is the app's registered scope? [Site] [SiteCollection] [SiteSubscription]"
$appPrincipal = Get-SPAppPrincipal -NameIdentifier $fullIssuerID -Site $site.RootWeb

#Remove the security token issuer and the app principal permission
Remove-SPTrustedSecurityTokenIssuer -Identity $issuerID -Confirm
Remove-SPAppPrincipalPermission -AppPrincipal $appPrincipal -Site $site.RootWeb -scope $appScope -Confirm

# Show confirmation that the issuer has been removed
Get-SPTrustedSecurityTokenIssuer | select Name,RegisteredIssuerName | fl

Tuesday, June 3, 2014

My First SharePoint 2013 Timer Job - App Project

Topic:Programming
Level:Advanced
Intended Audience:Architect and Developer

Welcome back. This is part two of my series on creating a SharePoint 2013 Timer job. Specifically I am going to cover the high-trust provider-hosted app project inside of Visual Studio. And, how to configure this app to use a App Only policy. So this part of the series is a little more tailored towards the developer and not so much the admin / IT professional.

I will warn that these instructions are really meant for a Development or Test server type scenario. For Production there are several changes that I am hoping common sense would dictate you change. For example, you would not use a password of password in a Production environment. Nor would you store your .PFX on the local machine you are doing development on. Use your own discretion and work closely with your admins / IT professionals in a Production scenario.

So what is the difference between high, low, and full trust?


A high-trust app is a provider-hosted app that uses digital certificates to establish trust between the remote web application (your app server) and SharePoint (your SharePoint server). The high-trust app can take over the identity of any user without knowing the user's password. SharePoint will then allow the app to work on the behalf of that user. This does not imply that the app can take over an administrator's account and have access to everything they have. The app has a specific manifest file that dictates the permissions it has. And, the user has to be okay with this when the app is being instantiated inside of SharePoint. So it is not a full fledged take over of that user's account.

Now, a high-trust application is not the same as a full-trust solution. A high-trust app must still make app permission requests as I explained. The full-trust solution scenario has the same permissions as the SharePoint environment itself. Meaning that the solution is installed and ran on the SharePoint server itself like you used to do in SharePoint 2010 (e.g., good ole WSP packages). The high-trust app should be installed on it's own isolated server and not on the SharePoint server itself.

A low-trust app uses a trust broker, such as Microsoft Azure Access Control Services (ACS), to act as a token issurer between SharePoint and the application. Low-trust applications can not "impersonate" or do actions on the behalf of other users like a high-trust application can. The low-trust app uses it's own app identity when communicating with the server and when requesting a token. This makes low-trust a great option for Office 365. It should also be noted that this low-trust scenario utilizes OAuth.

What are app authorization policies?


SharePoint has three types of authorization policies. User-only, User and App, and App-only.

The user-only policy is the policy that was always applied in SharePoint 2010. This policy takes into account only the user identity. In example, when a user is accessing resources directly without using an app at all they are using the user-only policy for authorization checks.

The user and app policy takes into account both the user identity and the app identity. When authorization is occurring this policy checks to see if both the current user and the app have permission to perform the action being requested. This is useful when the app does not run on the SharePoint server and whats to act on the behalf of the user to get access to the user's specific resources.

The app-only policy only takes into account the app identity. When authorization occurs SharePoint checks to see if the app has permission to perform the action in question regardless of what access the current user or any user might have. In example, the person who installs the app has the rights that the app needs and gives permission for the app to perform those actions for users even though those users might not have permission themselves to directly act. I should note that certain APIs require user context. Thus, they can not be executed with an app-only policy alone. For example, there are many APIs for interacting with Project Server 2013 and for performing search that an app-only policy may not be the appropriate policy choice for your app.


Setting Up Your Solution in Visual Studio 2013

These next steps assume that you have successfully completed the steps found in my previous article of this series.

  1. Open Visual Studio 2013 and click on Start | New Project... or File | New | Project....
  2. Select the App for SharePoint option under the Office/SharePoint menu.

  3. You will be asked to specify a site that you want to use for debugging your app. This is a site collection that is using the Developer Site template. You can have your administrator do this by going through Central Administration | Application Management | Create site collections. If you have already done this point the wizard to that location. Also make sure that Provider-hosted is selected. Click Next.

  4. Specify the ASP.NET Web Forms Application as the type of project you want to create.

  5. On the Configure authentication settings screen you will select the Use a certificate (for SharePoint on-premises apps using high-trust) option. In the appropriate fields you will enter some of the settings set from the previous blog article:

    Certificate location: C:\Certs\HighTrustApps.pfx
    Password: password
    Issuer ID: You can open the .CER file in C:\Certs and use the Issued By name.

  6. Click Finish.

You have just created your first high-trust provider-hosted app! You will need to configure SharePoint 2013 to use the certificate and configure it to trust your app. Again, I warn that this instruction is really only for Development purposes. To package and publish high-trust apps for SharePoint 2013 in Production read this article instead.

Enter the following PowerShell commands:


$publicCertPath = "C:\Certs\HighTrustAppsCert.cer"

$certificate = New-Object System.Security.Cryptography.X509Certificates.X509Certificate2($publicCertPath)

New-SPTrustedRootAuthority -Name "HighTrustAppsCert" -Certificate $certificate

$realm = Get-SPAuthenticationRealm

Next, you need to run this command. Your app will use an access token to get access to SharePoint data. This must be issued by a token issuer that SharePoint trusts. In this case, and for all high-trust apps, the certificate IS the token issuer. This command constructs an issuer ID in the format that SharePoint requires:

$specificIssuerId = "I used my Issued By name here"

$fullIssuerIdentifier = $specificIssuerId + '@' + $realm

In Production the $specificIssuerId must be a GUID because in Production each certificate must have a unique issuer. However, for development purposes you can hard code the value in like I have done.

Continue you along by entering the following:

New-SPTrustedSecurityTokenIssuer -Name "High Trust Apps Cert" -Certificate $certificate -RegisteredIssuerName $fullIssuerIdentifier -IsTrustBroker

The following commands are only ran in the Development scenario. If you do not run this you will get 403 Forbidden errors.

$serviceConfig = Get-SPSecurityTokenServiceConfig

$serviceConfig.AllowOAuthOverHttp = $true

$serviceConfig.Update()

You can save all of those commands into a file called HighTrustConfig-ForDebugOnly.ps1 and later run it again using the ./HighTrustConfig-ForDebugOnly.ps1 command inside the SharePoint Management Shell.

Test your application inside of Visual Studio by hitting your F5 key. If you are presented with the following messages...


...just click Yes and continue.

You should then see a web page being hosted by localhost (Visual Studio in this case via virtual directory) that contains the name of your Developer Site.

Congratulations! You should see a blank screen with the title of the SharePoint site you are running this app against. If everything is successful, continue now with the instructions on making your app use an App Only policy.

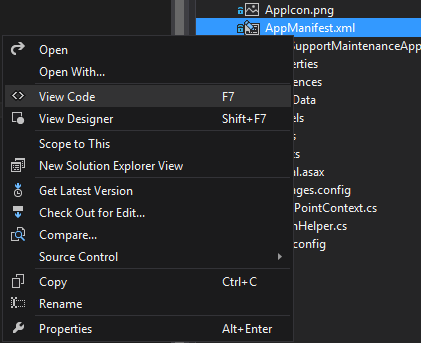
The first step is adding the AllowAppOnlyPolicy to the app's manifest. In Visual Studio this is found under the App Project. You will see two files initially. An AppIcon.png and a AppManifest.xml. You want to open the code for the app's manifest.


You will add the following code directly above the </app> closing tag.

<AppPermissionRequests AllowAppOnlyPolicy="true" >
    <AppPermissionRequest Scope="http://sharepoint/content/sitecollection/web/list" Right="Read" >
        <Property Name="BaseTemplateId" Value="101" />
    </AppPermissionRequest>
</AppPermissionRequests>

Or you can do this through the GUI just by double-clicking on AppManifest.xml. Then go to the Permissions tab.


NOTE: The BaseTemplateId property you see listed in the example really applies to Lists. If the identifier is not set it means your app will have that permission level on all types of Lists. The 101 listed there means, for example, that the app only has Read to Document Libraries. You can view the full list by visiting http://msdn.microsoft.com/en-us/library/office/ms415091(v=office.15).aspx and looking at the Type attribute.

Last, but not least, how do you use the TokenHelper to utilize the S2S protocol? Open your TokenHelper.cs file in the AppWeb part of the Visual Studio project to look at some of the code there. Specifically take a look at the GetS2SAccessTokenWithWindowsIdentity and the GetClientContextWithAccessToken methods. In your application you would pass a null for the WindowsIdentity parameter to get back a valid OAuth access token

string appOnlyAccessToken = TokenHelper.GetS2SAccessTokenWithWindowsIdentity(_hostWeb, null);

You can then obtain the Client Side Object Model (CSOM) client context to perform actions on the behalf of the user.

using (ClientContext clientContext = 
    TokenHelper.GetClientContextWithAccessToken (_hostWeb.ToString(), appOnlyAccessToken))
{
    List list = clientContext.Web.Lists.GetByTitle("Announcements");
    ListItemCreationInformation info = new ListItemCreationInformation();
    Microsoft.SharePoint.Client.ListItem item = list.AddItem(info):
    item["Title"] = "Created via CSOM";
    item["Body"] = "Created via CSOM on " + DateTime.Now.ToLongTimeString();

    item.Update();
    clientContext.Load(item);
    clientContext.ExecuteQuery();
}

Then to test just deploy your app and log on as a user who only has read permissions to the list. Execute the code and a new item will be created using the application's permissions. If you had included a user identity instead of a null you would see a message stating "...by Application on behalf of User".

In my next article I will explain the process of creating a Windows Service solution that will be used to handle the timing / schedule part of our application.

Sources:
http://msdn.microsoft.com/en-us/library/office/dn268593(v=office.15).aspx

Wednesday, May 21, 2014

My First SharePoint 2013 Timer Job - Setup

Topic:Environment, Configuration, and Programming
Level:Advanced
Intended Audience:Administrator, Architect, Developer, and IT Professional

I have decided to tackle what I considered to be a great starting point for first time app creators. I wanted to show you how I created the equivalent of a traditional SharePoint timer job (what used to be done via a sharepoint solution in sharepoint 2010) inside of SharePoint 2013's App model. Specifically for an on-premise SharePoint farm. This is mostly tailored towards the Developer but, there is a lot of useful information here for Admins, Architects, and IT Pros as well.

Microsoft Developer Network (MSDN) and various blog posts detail bits and pieces of what the IT Professional / Admin, the Developer, or the Architect need to know. Here I will take you from end-to-end. And, hopefully explain a bit along the way. I am assuming very little familiarity here with SharePoint 2013 but at least some understanding of the previous versions of SharePoint.

So what is on-premise?


On-premise software is installed and ran on servers within your organization rather than using servers that reside in the cloud. Opposite of on-premise would be a cloud based computing platform such as Microsoft Azure.

So what is a provider-hosted app?


A provider-hosted app is an application that is deployed and hosted outside the SharePoint farm. So where your solutions used to get installed directly onto the farm in the form of deployed WSP files, these applications do not. They are installed to the host web, but their remote components are hosted on another server. See the following example:


I will be making a few assumptions at this point. But just in case something seems off to you I will let you know in advance what servers I am on and those other types of details. Also, a lot of these steps will not need to be repeated for all of your projects moving forward. For example, you likely will not have to create a certificate every time. You can reuse the same self-signed certificate from your first project. A lot of these steps, however, will need to be repeated or changed a little based on the environment you are working in.

Setting Up Your Project (Development Environment)


The first thing we need to do is generate a self-signed certificate. The SharePoint project is going to require a certificate and for the initial phase of debugging a self-signed certificate works best.

  1. When you are debugging a high-trust app for SharePoint in Visual Studio, the remote web application is hosted in IIS Express on the machine where Visual Studio is installed. So the remote web application computer does not have an IIS Manager where you can create the certificate. For this reason, you use the IIS on the SharePoint test server to create the certificate. In IIS Manager, select the ServerName node in the tree view on the left.
  2. Select the Server Certificates icon, as shown below.

    Server Certificates option in IIS
  3. Select the Create Self-Signed Certificate link from the set of links on the right side, as shown below.

    Create Self-Signed Cerificate link
  4. Name the certificate HighTrustApps, and then choose OK.
  5. Right-click the certificate, and then select Export, as shown below.

    Exporting a test certificate
  6. In Windows, or at the command line, create a folder called C:\Certs.
  7. Back in IIS Manager, export the file to C:\Certs and give it a password. In my example above I used the password of password.
  8. If your test SharePoint installation is not on the same computer where Visual Studio is running, create a folder C:\Certs on the Visual Studio computer and move the HighTrustApps.pfx file to it. This is the computer where the remote web application runs when you are debugging Visual Studio.
Now we need to create a corresponding .cer file.

  1. On the SharePoint server, be sure that the app pool identity for the following IIS app pools have Read rights to the C:\Certs folder:
    • SecurityTokenServiceApplicationPool
    • The app pool that serves the IIS web site that hosts the parent SharePoint web application for your test SharePoint website. For the SharePoint - 80 IIS website, the pool is called OServerPortalAppPool.
    • You can see the Identity to use by looking under the Application Pools located under the ServerName node in the tree view on the left. Then just update the folder permissions to give that Identity Read access.
  2. In IIS manager, select the ServerName node in the tree view on the left.
  3. Double-click Server Certificates.
  4. In Server Certificates view, double-click HighTrustApps to display the certificate details.
  5. On the Details tab, choose Copy to File to launch the Certificate Export Wizard, and then choose Next.
  6. Use the default values and choose Next.
  7. Choose Browse, browse to C:\Certs, name the certificate HighTrustAppsCert, and then choose Save. The certificate is saved as a .cer file.
  8. Choose Next.
  9. Choose Finish.
If this has not been done yet we need to configure services in SharePoint 2013 for server-to-server app use.

  1. Ensure that the app management service and the user profile application are configured. The steps are as follows:
    • In Central Administration, under Application Management, select Manage service applications.
    • On the Service Applications page, ensure that the following services are started:
      • User Profile Service Application
      • App Management Service
    • Under Application Management, select Manage services on server.
    • On the Services on Server page, ensure that the following services are started:
      • User Profile Service
  2. Ensure that at least on profile is created in the User Profile Service Application. The steps are as follows:
    • In Central Administration, under Application Management, select Manage service applications.
    • Next, select User Profile Service Application.
    • On the Manage Profile Service: User Profile Service Application page, under People, select Manage User Profiles.
    • On the Manage User Profiles page, select New Profiles.
    • On the Add User Profile page, type your account name and email address.
    • Select Save and Close.
      • NOTE: If you get a message saying that the profile you are trying to create already exists, simply Cancel and Go Back.
    • Back on the Manage User Profiles page, you should see Total number of profiles: 1.
Again, if you have not done so already you need to install the Visual Studio 2013 developer tools found at http://msdn.microsoft.com/en-US/office/dn448479. This allows some key components of app development.

As an additional tip, you can enable verbose logging inside of Visual Studio 2013 by doing the following:
  1. Open the registry using regedit and navigate to HKEY_CURRENT_USER\Software\Microsoft\VisualStudio\12.0\SharePointTools.
  2. Add a DWORD key named EnableDiagnostics.
  3. Give the key the value 1.


If you want to create and deploy SharePoint-hosted apps on your SharePoint 2013 installation, you must create an isolated domain on the server where your apps for SharePoint will run. In this example I will show how to do this on the development workstation you are on. For development purposes, you can modify your hosts file as you need to route your development computer to a test instance of an app for SharePoint.

  1. Ensure that the spadmin and sptimer services are running by opening a command prompt and typing the following commands:

    net start spadminv4

    net start sptimerv4
  2. Create your isolated app domain by running the SharePoint Management Shell as an administrator and type the following command:

    Set-SPAppDomain "apps.mydevdomain.com"
  3. Ensure that the SPSubscriptionSettingsService and AppManagementServiceInstance services are running by typing the following command in the SharePoint Management Shell.

    Get-SPServiceInstance | where{$_.GetType().Name -eq "AppManagementServiceInstance" -or $_.GetType().Name -eq "SPSubscriptionSettingsServiceInstance"} | Start-SPServiceInstance
  4. You must specify an account under which the SPSubscriptionService and AppManagementServiceInstance service instances will run. This account must be an SPManaged account. You can create an SPManagedAccount by typing the following command in the SharePoint Management Shell. Please note, you will be prompted for the account DOMAIN\user and password.

    $account = New-SPManagedAccount
  5. Next you need to specify an account, application pool, and database settings for the SPSubscriptionService and AppManagementServiceInstance services by typing the following code into the SharePoint Management Shell. If you created a SPManagedAccount in the preceding step, use that account name here.

    $account = Get-SPManagedAccount "DOMAIN\user"

    $appPoolSubSvc = New-SPServiceApplicationPool -Name SettingsServiceAppPool -Account $account

    $appPoolAppSvc = New-SPServiceApplicationPool -Name AppServiceAppPool -Account $account

    $appSubSvc = New-SPSubscriptionSettingsServiceApplication -ApplicationPool $appPoolSubSvc -Name SettingsServiceApp -DatabaseName SettingsServiceDB

    $proxySubSvc = New-SPSubscriptionSettingsServiceApplicationProxy -ServiceApplication $appSubSvc

    $appAppSvc = New-SPAppManagementServiceApplication -ApplicationPool $appPoolAppSvc -Name AppServiceApp -DatabaseName AppServiceDB

    $proxyAppSvc = New-SPAppManagementServiceApplicationProxy -ServiceApplication $appAppSvc
    • NOTE: When I ran this for the first time I got a "The timer job did not complete running within the allotted time." error. To resolve that error message or others you come across I had to do a few additional troubleshooting steps.
      • I first checked to ensure that the SharePoint Timer Service under Administrative Tools | Services was in fact running.
      • I checked that my cache cluster was up for Distributed Cache. To do so type in the following command into the SharePoint Management Shell:

        Get-CacheHostConfig -ComputerName $env:computername -CachePort 22233

        That command should give you information about the current cache host. If that command does not work you may have to create a new cache cluster. The details of which can be found at http://msdn.microsoft.com/en-us/library/ff921027.aspx.
      • If your cache is up and running, try the following commands:

        Remove-SPDistributedCacheServiceInstance

        Add-SPDistributedCacheServiceInstance
      • If you still get unexpected errors try the following command:

        Restart-CacheCluster
      • Also you should check your service account's file read access to "C:\Program Files\AppFabric 1.1 for Windows Server\DistributedCacheService.exe.Config". Your service accounts may need to be granted read access to the top-level AppFabric directory if you are seeing script errors in the SharePoint Management Shell.
      • And finally, if all else fails try the following commands:

        Export-CacheClusterConfig -path D:\clusterconfig.xml

        Stop-CacheCluster


        Check within the config file if the host name is correct (change to the netbiosname) and that the service account is the same as is listed for your AppFabric Caching Service in services.msc.

        To import the configuration again use the following command:

        Import-CacheClusterConfig -path D:\clusterconfig.xml

        Start-CacheCluster


        To confirm everything is working properly try the following:

        Get-Cache

        Get-CacheClusterHealth
  6. Next you need to specify your tenant by typing the following command into the SharePoint Management Shell.

    Set-SPAppSiteSubscriptionName -Name "app" -Confirm:$false
You now need to add your isolated app domain to your IE bypass list. This ensures that you can navigate to that domain after you deploy a SharePoint-hosted app. You can skip this if your environment does not use a proxy server.
  1. In Internet Explorer, go to Tools.
  2. Choose Internet options.
  3. On the Connections tab, choose the LAN Settings button.
  4. Clear the Automatically detect settings check box.
  5. Select the Use a proxy server for your LAN check box.
  6. Choose the Advanced button, and then add *.YourAppDomain.com to the Exceptions list.
  7. Choose the OK button.
  8. Choose the OK button to close the Local Area Network (LAN) Settings dialog box.
  9. Choose the OK button to close the Internet Options dialog box.
EDIT: If you get a 401.1 Unauthorized Logon Failed message or logon prompts you may have to disable the loopback check. Just follow Method 2 of the following article to do this. That article can be found at http://support.microsoft.com/kb/896861.

That's it! Your server (isolated app) to server (SharePoint 2013 server) foundation is now setup. In my next post I will walk you through creating a high-trust provider hosted app for your SharePoint installation that uses a app only policy. Taking us one step closer to mimicking a SharePoint 2010 timer solution.


Monday, October 7, 2013

SharePoint's Automatic Workflow Cleanup and a Loss of Approvals

The Problem

I haven't posted in a while because I have been really busy at work. But, I think it appropriate to take a little bit of time to detail a very serious problem that cropped up. Specifically it applies to approval workflows and libraries / lists being audited. And, I want to take some time to also explain what I did to work around this issue.

For this scenario I will use the Foo library and the Bar workflow in any given example.

So last week an issue come in that the approvals in the Foo library had suddenly disappeared. Auditors had gone in to review the library but any approval that had been showing in the Foo Approvals column, courtesy of our Bar approval workflow, had suddenly vanished if the approval itself was older than 60 days.

I immediately went into the Foo Approval Tasks list to find that the approval tasks themselves had also disappeared. Not to be found in the Site or the Site Collection Recycle bins either.

My next diagnostic step was to look at the Activity Duration Report to determine if these approvals had ever even occurred in the first place.


Sure enough, all of the data was there supporting that the approvals had occurred. After much more painstaking research and eyebrow raising I came to the conclusion that this wasn't the doing of some human. I had begun to think that someone had come in and deleted the Bar Workflow just to recreate another Bar Workflow with the same name. This too, wipes out prior Approvals but doesn't explain the every 60 days component.

Then I found it. The Automatic Workflow Cleanup job.


Microsoft actually designed this job in SharePoint to delete workflow instances and related task entries that still existed 60 days after the workflow completed or was canceled. WHAT?!? So now there is no evidence that my valuable and precious List items were approved?

Here is what they say about this:
By default, Microsoft SharePoint Server 2010 runs a daily Workflow Auto Cleanup job to permanently delete workflow instances and related task entries that still exist 60 days after a workflow is completed or canceled. Workflow history items themselves are not deleted, but the entry point to view them on the status page for a particular instance of a workflow will no longer be available. You can disable the Workflow Auto Cleanup job if you want to keep workflow data available longer. However, as with any SharePoint list, as the workflow history and task lists grow in size, site performance may be compromised. If you are concerned about the size of these lists, keep the Workflow Auto Cleanup job enabled. Whether or not you keep the Workflow Auto Cleanup job enabled, you can create a separate history and task list for each workflow association to distribute items across lists.
Workflow history is not intended to be used to audit workflow events and is not necessarily secure because a user who has edit permissions on the site can update items in the history list, by default.
And there you have it. In a nutshell we are not supposed to be using workflows for auditing purposes. *sigh*

The Workaround

The most appropriate work around is to use the auditing capabilities already found within SharePoint. I would even suggest doing this in conjunction with a Records Center and coupled with a solid retention policy. No small task when given the scale of that project. IT Admins, corporate Compliance Officers, Legal, Finance, Business Analysts and many other folks are required for that undertaking.

To solve this issue quickly I did the following:

  1. Opened the Workflow History list. This can be accessed by visiting http://[domainname]/[sitename]/lists/Workflow%20History or another similar path depending on where you are pointing the workflow's history.
  2. Created a new view called "Audit View" using the "All History" view as a basis. This will create a special URL http://[domainname]/[sitename]/lists/Workflow%20History/Audit%20View.aspx. During creation of the view I would recommend a few slight changes to make this easier to read for your auditors / compliance officers.
    • Only display the Description, Outcome, Date Occurred, User ID, and Data columns.
    • Sort by Date Occurred.
    • Filter where List ID is equal to the GUID (for example {066c342b-0715-4583-8a20-9a1f725e5359} or another number) to the type of item you are auditing. This is particularly useful if you are grouping all your histories into one history list.
    • Group by Primary Item ID and then by Workflow History Parent Instance.
  3. Back on your actual document library create a new Calculated column called "Audit Link". The formula will be similar to the following (change URL as is appropriate).
    =CONCATENATE("http://[domainname]/[sitename]/lists/Workflow%20History/Audit%20View.aspx?FilterField1=Item&FilterValue1","=",ID)
  4. You should now have a column that contains a URL to your Workflow History. Another annoyance I found is that apparently you can't put proper URLs in a calculated field. So users will need to copy / paste this into the browser. Or, I would recommend using a bit of JavaScript to handle the links for you.
  5. The last step involves going back to your Workflow History list. I would recommend modifying the permissions on this list as you deem is appropriate. Microsoft is correct in stating that the workflow history "...is not necessarily secure because a user who has edit permissions on the site can update items in the history list, by default.". I would recommend Restricted Read or Read here.
That's it! This is really only a short term work around for this problem. As I outlined above a more proper solution is to discuss File Retention, Compliance, and Record Centers with the appropriate teams.

Monday, July 1, 2013

Add additional / multiple build controllers for Microsoft Team Foundation Server 2012

While Microsoft doesn't officially support a multi-controller scenario for Team Foundation Server (TFS), sometimes it is a necessity. Especially when you have multiple Team Project Collections and are left holding one build controller.

The following steps will allow you to build additional controllers and manage them, in TFS 2012. As always,  I recommend doing a snapshot or backup of your server prior to making high-level changes such as this.

  1. First, open a Command Prompt window (as an Administrator).
    • From the Windows 2012 Server screen right-click and go to All apps.
    • Under the Windows System category right-click on Command Prompt and select the option to Run as administrator.
  2. In the Administrator: Command Prompt window, type in the following command.

    Note: You need to replace the [service name] with your build controller's service name. Also, you need to replace the [display name] as well with something that makes sense for you. I've included some best practice examples for you. "BuildService-TeamProjectCollectionName" and for the Display Name you would enter "Visual Studio Team Foundation Build Service Host (TeamProjectCollectionName)" for example. Make sure to remove the placeholder brackets [ ] and to keep spacing as it is below. Or this will not work.

    sc.exe create [service name] binpath= "C:\Program Files\Microsoft Team Foundation Server 11.0\Tools\TFSBuildServiceHost.exe /NamedInstance:[service name]" DisplayName= "[display name]"

  3. Hit your Enter key. You should get a message that [SC] CreateService SUCCESS. Otherwise, review the command above to rule out any errors or mistakes in keying.
  4. Now you need to register the controller and agents via the Team Foundation Server Administration Console. However, if you open the console via your icon you will only see your original build controller.

    There is an easier way. Create a batch file (.BAT) on your desktop. Add the following code to it, modifying where appropriate and without the placeholder brackets [ ]:


    :: Set the service host environment variable
    set TFSBUILDSERVICEHOST.2012=[service name]

    :: Open the Team Foundation Server Administration Console
    "C:\Program Files\Microsoft Team Foundation Server 11.0\Tools\tfsmgmt.exe"

  5. Run the batch file. This should open a TFS Admin Console window where the new build controller is accessible.
  6. On the Build Configuration screen click on the Register link. This process is similar to that found here. Your registration properties should be left pretty much alone. The only exception here is the Display Name. Best practice is to call it your Default Controller - YourServiceName.
  7. In some cases there may be a conflict between your controller URI and the original controller (they both may try to use the same address / port). Give it a few minutes and if an error appears on the screen via logs do the following:
    1. Register a build controller + agent as explained here. Then unregister the build controller service.
    2. Re-register the build controller service. After which, modify the URL to use a different port.
    3. Register your build controller + agent as you normally would.
That's it. You should now have two or more build controllers that won't conflict with one another. And, you can use that batch (.BAT) to get back in to manage your build controller / agents as needed.

Good luck and I hope this helps.

Thursday, June 27, 2013

Team Foundation Server - Branching and Merging Demystified

I have been asked frequent times to explain how branching and merging work in Microsoft's Team Foundation Server (TFS). There is often a lot of uncertainty (even for developers) which surrounds the concepts of branching and merging. More often than not this doubt arises regardless of the repository solution being used.

It is my hope that some of the information (both my own experience and knowledge gathered collectively from the internet) I am about to detail will not only explain some of the fundamentals behind setting up a correct branching and merging strategy, but will also help provide some guidelines for you to apply in your own solution.

Please note that most of the concepts below can really be applied to any repository solution. But, the information I am providing is truly in relation to Microsoft's TFS.

Also, this is not light reading by any means. So don't expect a TLDR version. (That is too long, didn't read for you non-geek folks)

What is a branch?


A branch is a set of files in a different part of your repository that allow two or more teams of people to work on the same part of a project in parallel. When you create a branch, it does not actually create new copies of all those files on the server. It instead creates a record pointing to them. This is the primary reason why creating a branch with a vast number of files can be done so quickly.

An example...


Imagine that two developers have modified the same line of code in the same file across two different branches. The person responsible for merging those two branches together must make a decision as to which change will "take". In some cases, this will result in a hybrid merge, where the combination of the intent behind the two changes requires a different result than the text in those version being merged.

The branch that contains your changes that are being merged is commonly referred too as the source branch. The branch you want to merge your changes into is referred too as the target branch. The common ancestor between them is often referred too as the base version. When you do a merge, you can select a range of changes in the source branch to merge into the target branch.

What happens if there is a conflict?


If the same file has been modified in both the source and the target branches, TFS will mark this as a conflict. If the file has been modified in both branches, it will always be flagged as a conflict, even if the changes are to completely different parts of the file.

For certain changes, TFS can make an educated guess about what should happen. This is often referred to as an automerge. When the automerge occurs, TFS will allow you to review the changes to make sure the desired merge behavior has been performed.

Another example...


Two different bug fixes are being implemented. You probably want both changes. However, if the two corrections were just fixing the same bug in two different ways, you may want to consider a different avenue. In most cases, where your development team has good communication, the changes are a result of different changes being made to the file.

In the example above, automerge can do a great job of merging the changes together, making it easy for the developer to validate those changes.

There are many scenarios that may require more manual conflict resolution. In that the person performing the merge is responsible for deciding the correct outcome based on their understanding of the code and communicating with the team members who made the conflicting changes to understand their intent.

What is a branch relationship?


When you create a branch, the relationship between those branches form a standard hierarchy. In that the source of the branch is the parent, and the target of the branch is the child. Children who have the same parent are often referred too as sibling branches.

Baseless Merging


A baseless merge is when two arbitrary branches merge without reference to the base version. This is sometimes a necessity when the source code was originally imported in a flat structure without the branch relationship being in place, or if you want to merge between a branch and another branch not a direct parent or child.

Since there is not a base version to compare against, the chance that the server will detect conflicts between the two branches increases significantly.

Yet another example...


If a file is renamed in one branch and modified in another, it will show up as a file delete conflicting with the file edit, and then a file add that gives no hint as to which file it was related to, or that there was an edit intended for this file in the other branch.

For this reason, among others, baseless merges are frowned upon in TFS. A warning will appear whenever a baseless merge operation is selected in Microsoft's Visual Studio (VS). Standard merging through the VS or Eclipse clients are the best practice and recommended method. Where only one branch up or down (a parent to a child or vice versa) is allowed. Your branching strategy and model should attempt to constrain most merges between parent and child branches to minimize the amount of baseless merging required.

What is Forward or Reverse Integration?


When you merge code from a parent branch to the child branch, it is considered forward integration (FI). When you merge code from a child branch to the parent branch, it is referred to as reverse integration (RI). If you are doing feature development in branches, it is common to use FI at various points during the feature development cycle, and then to use RI at the end.

What are some common Branching Strategies?


Back in February I posted a very brief description of a Branch Per Release versus a Code-Promotion Branching strategies. In it I touched on the flaws and benefits surrounding those branching strategies. This time I will spend more time detailing some common strategies, why we have them, and how they are used.

Each strategy has its pros and cons. However, just as every strategy in chess is made up of simple moves, every branching strategy uses one or more combinations of some basic techniques. When developing your own strategy, you should take into account your own needs.

When looking at any branching strategy, you should keep in mind the following:
  • Always chose simplicity over control.
  • Branch only when you really need to.
  • If you ever want to merge two branches together, keep the time between merges to a minimum.
  • Ensure that your branch hierarchy matches the path you intend your merges to follow.

No Branching


This may sound a bit counterintuitive, but often the simplest technique is to not branch at all. This should always be your default position when it comes to branching and merging scenarios. Do not branch unless you need to. Keep in mind that you are using a version control tool that tracks changes over time. You can branch at any point in the future from a point in the past. This gives you the flexibility of not having to create a branch "just in case". Again, create branches only when you really need too.

There are measures you can take, however, to ready yourself to make branching easier in the future if you decide you need a branch. Some TFS specifics incoming.
  1. When you first create your team project in TFS create a folder called Main.
  2. Check it in.
  3. Right-click the folder in Source Control Explorer and select Branching and Merging | Convert to Branch.
This gives you an easy point to branch from in the future, and it also makes you think about the areas of your source code that live in the same branch together. This will also help you should you ever decided to do a branch.

No branching? In reality you have only one branch of code to work in for all teams. This technique works great when you have small teams working on the same codebase, developing features for the same version of the application and supporting only one version of the application at a time. At some point, no matter how complex your branching strategy evolves to support your business needs, you need at least one stable area that is your main (also known as the mainline or trunk) code. This is a stable version of the code that will be used for the build that you will create, test, and deploy.

During stabilization and test periods, while you are getting ready to release, it may be necessary for the team to not check in any new code (essentially a code freeze). With smaller teams working on a single version, this does not impact productivity, because the people who would be checking in code are busy testing to ensure that the application works, as well was getting ready for deployment.

With this in mind, there is no way to start work on something new before the final build of the current version has been executed. The code freeze period can, therefore, be very disruptive because there is no way to start work on the next version until the current one has shipped. It is these times when other strategies become useful for teams of any size, even a team of one.

Branch per Release


For development teams that employ branching, the most common branching technique is branch per release. With this technique, the branches contain the code for a particular release version.

Development starts in the Main branch. After a period of time, when the software is considered ready for testing, a branch is made to the V1.0 branch under Releases/Staging or Releases/Test. At which time the test build is pushed into the staging or test environments. Again, after a period of time, when the software is considered ready, a branch is made to the Releases/Production location with the final production build getting a label to indicate which versions of which files were in that version. Meanwhile, development of new features for version 2 (V2 in this example) continues on the Main branch.

A scenario to consider...


Say some minor changes are requested or bugs discovered in production, and a small modification is necessary to reflect how the business needs something to work. However, the development group does not want to include all the work for V2 that has been going on in the Main branch. Therefore, these changes are made to the V1 branch, and builds are taken from it. Any bug fixes or changes that must also be included in the next version (to ensure the bug is still fixed in that next release) are merged back (reverse-integrated or RI) into the Main branch. If a bug fix was already in the Main branch, but needed to go into V1, it might be merged (forward-integrated or FI) into it. At a certain point, the build is determined to be good, and a new V1.1 build is performed from the V1 branch and deployed to production.

During this time, development on the next version can continue uninterrupted without the risk of features being added into the code accidentally and making their way into the V1.X set of releases. At a certain point, suppose it is decided that V2.0 is ready to go out the door, the mainline of code is branched again to the V2 branch, and the V2.0 build is created from it. Work can continue on the next release in the Main branch, but it is now easy to support and release new builds to customers running on any version that you want to keep supporting.

Branch per release is very easy to understand and allows many versions to be supported at a time. It can be extended to multiple supported releases very easily, and it makes it trivial to view and compare the code that was included in a particular version of the application. Branch per release is well-suited to organization that must support multiple versions of code in parallel -- such as a typical software vendor.

However, for a particular release, there is still no more parallelism of development than in a standard "no branching" strategy. Also, if the organization must support only two or three versions at a time (the latest version, the previous version, and, perhaps, the version currently being tested by the business), this model can lead to a number of stale branches. While having lots of old, stale branches doesn't impact performance of Team Foundation Server, or even cause any significant additional storage requirements, it can clutter the repository and make it difficult to find the versions you are interested in -- especially if the organization frequently releases new versions. If this is the case, you may want to move old branches into an Archive folder, and have only the active branches (the versions that the development team are currently supporting) in the Releases folder.

Code-Promotion Branching


An alternative to branch per release is code-promotion branching (or, as it is sometimes referred to, promotion-level branching). This technique involves splitting the branches into different promotion levels.

As before, development starts with just the Main branch. When the development team is ready to test the application with the business, it pushes the code to the Test branch (also often called the QA or Staging branch). While the code is being tested, work on the next development version is carried out in the Main branch. If any fixes are required during testing, they can be developed on the Test branch and merged back in to the Main branch for inclusion in the next release. Once the code is ready to release, it is branched again from Test to Prod. When the next release cycle comes along, the same is done again. Changes are merged from Main to Test, and then Test to Prod.

Code-promotion branching works well in environments that have a single version running in production but have long test-validation cycles that do not involve all of the development team. This allows development to continue on the next version of Main while test and stabilization of the build occurs in the Test branch. It also makes it trivial for the development team to look at the code currently on each system. Finally, a branch structure makes it easy to create an automated build and deployment system using Team Foundation Build that can automatically update the QA/Test/Staging environment as code is pushed to the QA branch.

Feature Branching


The previous branching strategies all involve a single team working on the system in its entirety as it works towards a release. All features for that release are developed in parallel, and the build can be deployed only when all features in flight have been completed and tested. However, in large systems, or systems that require very frequent deployment (such as a large commercial website), feature branching (or branch per feature) can be useful.

Feature branching is used when a project requires multiple teams to be working on the same codebase in parallel. For example, you could have four feature teams working in separate branches (lets call it F1, F2, F3, and F4). Note that in a real branching structure, the feature branches themselves would likely have meaningful names such as BroadbandSelling, TroubleTickets, or whatever shorthand is used by the project to refer to the feature that is under development. The Main branch is conserved "gold code", which means no active development goes on directly in this branch. However, a feature must be reverse-integrated into this branch for it to appear in the final build and for other teams to pick it up.

Initially, F1 is started with a branch from Main. But, while it is being developed, a second and third team start F2 and F3, respectively. At the end of development of the feature, F1 is merged back into the Main branch, and the F1 branch is deleted. Then, that team starts on feature f4. The next feature to finish is F3, followed by F2. At each point, once the feature is merged into the Main branch, a new version of the software is released to the public website. But only one version is ever supported at any time.

Feature branching allows for a large amount of parallel development. However, this comes at the cost of delaying the pain of integrating each team's changes until the feature is complete, and you are merging the feature branch back into the Main branch. For example, when merging the F2 branch, all changes and inevitable conflicts introduced by features F1, F2, F3, and F4 must be analyzed and resolved.

The longer a period of time that code is separated into branches, the more independent changes occur and, therefore, the greater the likelihood of merge conflicts. To minimize conflicts, and to reduce the amount of integration debt building up, you should do the following:
  • Keep the life of the feature short. Features should be as short as possible and should be merged back into the Main branch as soon as possible.
  • Take integrations from the Main branch regularly. When F1 is merged back into Main, the feature teams still working on their features should merge those changes into their feature branches at the earliest possible convenient point.
  • Organize features into discrete areas in the codebase. Having the code related to a particular feature in one area will reduce the amount of common code being edited in multiple branches and, therefore, reduce the risk of making conflicting changes during feature development. Often, the number of teams that can be working in parallel is defined by the number of discrete areas of code in the repository.
When using feature branching, the whole team does not necessarily have to be involved. For example, one or two developers might split off from the rest of the team to go work on a well-isolated feature when there is a risk of the move not being possible (they are working on a proof of concept), or when it is decided that the current release should not wait for that particular feature to be implemented.

What does this all mean?


In conclusion, you can now see the benefits of having a solid branching strategy before utilizing your repository tools. Be it TFS or some other solution. TFS not only allows for some complex software configuration management scenarios, but also provides the tooling to help understand what is happening with changes in your repository