Showing posts with label secure socket layers. Show all posts

Tuesday, February 5, 2013

How to install a self-signed certificate as a Trusted Root CA

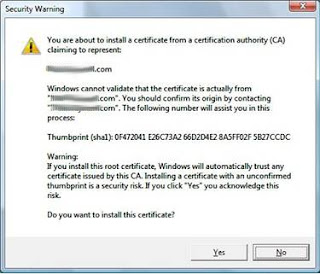
I'm sure there are other sources on the Internet for this task but, I wanted to provide what worked for me. Here are the basic instructions for installing a self-signed certificate into your trusted root Certification Authority (CA). These instructions were designed with Windows Vista or higher in mind. But, should suffice as a basic guideline for lower versions of Windows. Be absolutely sure you trust this certificate before doing this.

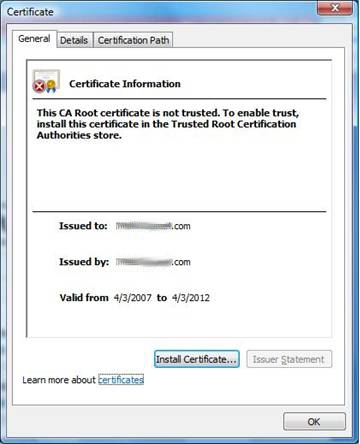
  1. When you get the security alert that "The identity of this web site or the integrity of this connection cannot be verified" you should see an option to View Certificate. Click on that.
  2. Next, click on Install Certificate....


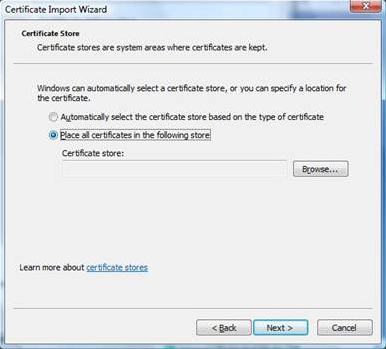
  3. Under the Certificate Import Wizard choose the option "Place all certificates in the following store" and select browse.


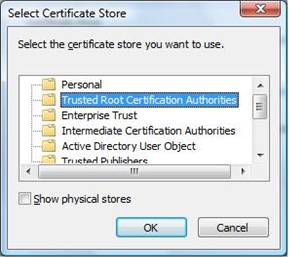
  4. Select Trusted Root Certification Authorities and click OK.


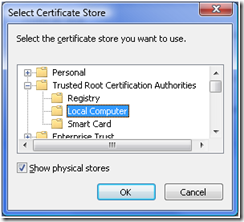
  5. Select Local Computer (some cases you have to select Show Physical Stores here). Click OK.


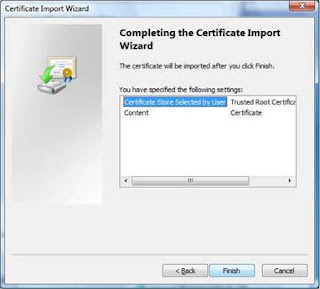
  6. Click Finish on the Completing the Certificate Import Wizard screen.


  7. Click yes on the warning message to install the certificate.


  8. Done!
You shouldn't be pestered by the alerts any longer for the certificate that you just installed. Remember though that these are only valid for the domain you are installing on. You can follow the same instructions for other domains though if needed.

Friday, September 30, 2011

Self-Signed Certificate (SSL), SharePoint Designer 2010, and a SOAP Service Connection... Making it work

If you are here you have probably at some point seen the dreaded message...

"The server returned a non-specific error when trying to get data from the data source.  Check the format and content of your query and try again.  If the problem persists, contact the server administrator."

Maybe even specifically whilst attempting to implement a SOAP Service Connection's data view into your ASPX page.  The SOAP service living on a server with SSL enabled and using a self-signed certificate.

Have no fear.  I am going to explain what leads you to this problem and how to correct it.

While setting up my ASP.NET Web Service I had a need to configure localhost to use SSL.  Once this was done I needed to add the service to SharePoint.  In my case, through the SOAP Service Connection GUI located in SharePoint Designer 2010.

The funny thing with Designer is that it attempts to hit the web service through your local machine, but it validates your SSL on the actual SharePoint site (even if you are pointed to a non-local instance of SharePoint).  It does this because of the DataFormWebPart that is being placed in the page.  This paradox hoses up your ability to test the Web Service if you haven't told SharePoint to trust your certificate.

It is really simple to correct this problem.
  1. Export your certificate using the Microsoft Management Console.
    1. Make sure you choose DER Encoded Library X.509 (.CER).
  2. Open your Central Administration site in SharePoint.
  3. Click on the Security heading.
  4. Under General Security you will want to select Manage trust.
  5. Enter the name of your trust relationship and point to the .CER location.
  6. Click OK.
  7. You may or may not need to perform an iisreset.
That is it.  Your Web Service should now work, using SSL, and on your local machine.  You may have to fiddle around with your WSDL url in the Data Sources area of SharePoint Designer.  Try https://localhost and https://127.0.0.1 and even try https://yourpcname.  You may also need to include the port (443) on your url.

I hope this helps.
Wednesday, September 28, 2011

How to enable SSL on IIS 7.0 for localhost

As a developer I have a need to do  this thing called development.  And for me to develop solutions that will one day live on a SSL enabled website, it just makes sense to enable SSL for localhost.

This walk through will hopefully get someone using IIS 7.0 up and running with SSL.  And IIS 7.0 makes this very easy to do.
  1. Make sure you have IIS 7.0 installed.
  2. Click on Start from your desktop.
  3. Hover over Administrative Tools.  This will present you with some additional options.
  4. Click on Internet Information Services (IIS) Manager.
  5. Under the IIS category, double-click on Server Certificates.
  6. Under the Actions pane on the right-hand side of the screen, click on Create Self-Signed Certificate.
  7. Enter a "friendly name" for the certificate request.  In this case I used 'Localhost' minus the single quotes.  Since I was aiming for https://localhost as my URL.
  8. In the Connections window to the left expand (if not already) in the follow order: Local Computer Name => Sites.
  9. Under Sites heading (in the left pane still) click on Default Web Site.
  10. On the right-side window pane select Bindings.
  11. In the Site Bindings window click Add.
  12. Set the following fields accordingly:
    1. Type => https
    2. IP Address => All Unassigned
    3. Port => 443
    4. Host name => 
    5. SSL certificate => Localhost (or whatever you named it)
  13. Click OK and Close to return to the management screen.
  14. You should now see Browse *:443 (https) in the far right window pane.  Click on it to verify that the binding worked.
    1. You may be warned that it is an "untrusted connection" or a "phishing attempt".  This is just your browser not liking a self-signed certificate.  You can ignore it.  Add https://localhost into your trusted sites to avoid it in the future.
That is it.  You have now enabled SSL on localhost for IIS 7.0!