Tuesday, February 19, 2013

Building custom SharePoint 2010 Site Pages using Visual Studio (Part II)

Hello again. In my previous post I showed you how to create customized Site Pages using Visual Studio (VS) instead of being limited by SharePoint Designer (SPD). Now I am going to explain how to instruct SharePoint that it is alright to allow code-behind for these Site Pages. Which by default, is not allowed.

NOTE: You will absolutely want to configure your event handler to undo these changes when appropriate and to make these changes when appropriate. This way you can be sure that when the feature is activated / deactivated.... you get the drift. My recommendation would be to create a separate feature just for this security change. My previous feature was called CustomPages so I will name this one CustomPages Security.

  1. Add SafeControls
    • Click on your module (SitePages from my last post) and open your properties window.
    • Under the SafeControls section add a new SafeControl.
      • Assembly = $SharePoint.Project.AssemblyFullName$
      • Namespace = CustomPages
      • TypeName = MyCustomPageTemplate
      • Safe = true
      • SafeAgainstScript = false
  2. What happens to my web.config?
    • What is getting added to the web.config is the following:

      <SafeMode MaxControls="200"
                         
      CallStack
      ="false"
                         
      DirectFileDependencies
      ="10"
                         
      TotalFileDependencies
      ="50"
                         
      AllowPageLevelTrace="false">
          <PageParserPaths>
              <PageParserPath VirtualPath="/SitePages/MyCustomPage.aspx*"
                                          CompilationMode="Always"
                                          AllowServerSideScript="true"
                                          IncludeSubFolders="true" />
          </PageParserPaths>
      </SafeMode>
    • Create a new feature and add an event receiver to it. This feature's scope also needs to be WebApplication (you can check by double-clicking the feature to bring up designer view).
    • Add the following code and change as is appropriate for your needs. This is the sample and shouldn't be used as a straight copy / paste.

      using System;
      using System.Collections.ObjectModel;
      using System.Runtime.InteropServices;
      using System.Security.Permissions;
      using Microsoft.SharePoint;
      using Microsoft.SharePoint.Security;
      using Microsoft.SharePoint.Administration;

      namespace CustomPages.Features.CustomPages_Security
      {
          /// <summary>
          /// This class handles events raised during feature activation, deactivation, installation, uninstallation, and upgrade.
          /// </summary>
          /// <remarks>
          /// The GUID attached to this class may be used during packaging and should not be modified.
          /// </remarks>

          [Guid("674c2a19-9913-4465-af57-198bd0416b49")]
          public class CustomPages_SecurityEventReceiver : SPFeatureReceiver
          {       
              public override void FeatureActivated(SPFeatureReceiverProperties properties)
              {
                  SPWebApplication webApp = properties.Feature.Parent as SPWebApplication;

                  SPSecurity.RunWithElevatedPrivileges(delegate()
                  {
                      SPWebConfigModification wcMod = new SPWebConfigModification();

                      wcMod.Path = "configuration/SharePoint/SafeMode/PageParserPaths";
                      wcMod.Name = "PageParserPath[@VirtualPath='/SitePages/MyCustomPage.aspx']";
                      wcMod.Owner = "CustomPages";
                      wcMod.Sequence = 0;
                      wcMod.Type = SPWebConfigModification.SPWebConfigModificationType.EnsureChildNode;
                      wcMod.Value = "<PageParserPath VirtualPath='/SitePages/MyCustomPage.aspx' CompilationMode='Always' AllowServerSideScript='true' />";

                      webApp.WebConfigModifications.Add(wcMod);
                      webApp.Farm.Services.GetValue<SPWebService>().ApplyWebConfigModifications();
                      webApp.Update();
                  });

              }

              public override void FeatureDeactivating(SPFeatureReceiverProperties properties)
              {
                  SPWebApplication webApp = properties.Feature.Parent as SPWebApplication;

                  SPSecurity.RunWithElevatedPrivileges(delegate()
                  {
                      Collection<SPWebConfigModification> wcMods = webApp.WebConfigModifications;
                      int initialModificationsCount = wcMods .Count;

                      for (int i = initialModificationsCount - 1; i >= 0; i--)
                      {
                          if (wcMods [i].Owner == "CustomPages")
                          {
                              SPWebConfigModification modToRemove = wcMods[i];
                              wcMods.Remove(modToRemove);
                          }
                      }

                      if (initialModificationsCount > wcMods.Count)
                      {
                          webApp.Farm.Services.GetValue<SPWebService>().ApplyWebConfigModifications();
                          webApp.Update();
                      }

                  });
              }

          }
      }
There you have it. Not only do you have a customized Site Page from Visual Studio but, it also is allowed to use code-behind. I hope this helps you.

Building custom SharePoint 2010 Site Pages using Visual Studio (Part I)

Hi everyone. I decided today to write some instructions on how to create Site Pages that you can customize via Visual Studio (VS). Including the ability to execute server-side scripting. As I couldn't find a good resource on the internet for this I decided to do it myself.

First you need to create the custom site page. You could go through and build the page completely within SharePoint Designer (SPD) but, this will at least give us a good starting point for VS.

  1. Launch Internet Explorer (IE) and navigate to the Site where you wish to create your custom site page. In my case this will be http://localhost/mycustomsite.
  2. Select Site Actions | Edit in SharePoint Designer.
  3. Select File | Add Item | New Page from Master | v4.master (Default) | Create. When it asks you, change the name to MyCustomPageTemplate and in my case I am using the Site Pages library. But, you can use any Wiki Page Library you have setup as well.
  4. Click OK.
  5. Give it a second or two and when the alert comes up just click Yes.

    NOTE: At this point I am assuming C-Sharp (C#) but if you are a Visual Basic (VB) programmer you can just change the language setting in the page tag as is appropriate.
  6. Switch the page to Design view.
  7. Locate the PlaceHolderMain(Master) content place holder. It is the open area in the middle of the page for those not familiar. In the menu for it, click Create Custom Content. That menu can be accessed by clicking the little drop-down arrow right on the component itself.
  8. You can now click into the PlaceHolderMain(Custom) area, notice it says custom now, and it can be editted. Type some placeholder information like "My Content Goes Here".
  9. Switch the page to Code view.
  10. Hit [CTRL+A] to highlight all the contents of the page and [CTRL+C] to copy it into your clipboard.
  11. Save the page and close SPD.
Now we are ready to get into VS to finish our page up. We are going to use a Module to provision the page(s) in SharePoint. To provision a file into a particular document library (e.g., Site Pages) you need to create a module with the same name as the document library. You then add the files you want provisioned and fix up the Categorical Abstract Machine Language (CAML) file so they load the way you want them too.

  1. Launch VS and create a new Empty SharePoint Project. Let's call it the CustomPages project for now.
  2. Right-click the CustomPages project and select Add | New Item | Module.
  3. Name the module SitePages or whatever your library is and click Add.
  4. In the CustomPages project, select File | New File... | Web | Visual Basic or C# | Web Form and click Open.
  5. Right-click inside the contents of the file (anywhere on the screen should be fine) and select Move Default1.aspx into | CustomPages. Navigate to your SitePages module and save the file there with a name of MyCustomPage.aspx or whatever you want to call it.

    NOTE: Make sure that the new page shows up in your Solution Explorer window under the SitePages folder. If it doesn't you may need to drag-and-drop it there.
  6. Highlight all of the contents of the MyCustomPage.aspx and replace with the contents on your clipboard.
  7. Expand the Features folder and double-click Feature1 to open its settings.
  8. Set the feature title to CustomPages (or whatever makes sense) and set an appropriate description.
  9. Switch back to your solution explorer. Go ahead and delete the Sample.txt document found in your SitePages module folder.
  10. Open the Elements.xml document for editting. Remove the SitePages/ from the Url. The Path attribute should be left alone.
  11. Add the attribute Type with the value GhostableInLibrary to the File element you just modified. Also, add a Url of SitePages to the Module element. Should look like something this:
     
    <?xml version="1.0" encoding="utf-8"?>
    <Elements xmlns="http://schemas.microsoft.com/sharepoint/">
        <Module Name="SitePages" Url="SitePages">
            <File Path="SitePages\MyCustomPage.aspx"
                     Url="MyCustomPage.aspx"
                     Type="GhostableInLibrary" />
        </Module>
    </Elements>
     
  12. Save all of your changes.
You should now be able to Build and then Deploy. Congratulations, you now have a Site Page constructed in VS and deployed to your site.

In my next blog post I'll describe how to mark your page as safe and show how to enable code-behind for these Site Pages.

Thursday, February 7, 2013

How to setup a SharePoint 2010 list to accept email submissions

This question has actually cropped up often here recently. Both for work and from members of the SharePoint community. Essentially people want to be able to hit an email address and have their contents transform into SharePoint 2010 list objects.

This is actually very easy to configure and setup. The following instructions assume that Exchange is being used. So please feel free to modify "here and there" as necessary.

First, you need to make sure your SharePoint Farm has SMTP enabled. Next, after following the instructions on MSDN do the following (or have your Farm Administrator do the following):

  1. Open Central Administrator
  2. Click on the System Settings heading.
  3. Under the E-Mail and Text Messages (SMS) heading, click on Configure incoming e-mail settings.
    • You may see a few messages if this has never been setup before. The SMTP service must be running on the farm. Refer to the MSDN link above if you need help configuring this.
  4. Under the Enable Incoming E-Mail category:
    • Enable sites on this server to receive e-mail? (Yes)
    • Use the SharePoint Directory Management Service to create distribution groups and contacts? (Yes)
  5. Click OK.
  6. Click on the Monitoring link under your Quick Launch navigation (on the left).
  7. Click on Review job definitions under the Timer Jobs heading.
    • This may take a little bit to render the page as jobs are cleared.
  8. Click on the job Microsoft SharePoint Foundation Incoming E-Mail.
    • You can reconfigure the job timer for emails, if necessary. Please note that if the job doesn't run properly you should check security on your "Drop Folder".
  9. Exit Central Administrator
Next, you will need to configure your List or Library to properly accept emails as added items on the list / library. Please keep in mind you can only do this for the following types of SharePoint lists:

  • Document library
  • Form library
  • Picture library
  • Announcements list
  • Calendar list
  • Discussion board
  • Blog
SharePoint doesn't support if you are using a custom list or something outside what I listed above. To configure your list (or library, which is very similar in settings) just do the following:

  1. In the List use the ribbon to access the List Tools | List | List Settings.
  2. Under the Communications heading you should now see an Incoming e-mail settings option. Click on it. If it isn't there, you need to recheck your settings within Central Administrator.
    • Allow this list to receive e-mail? (Yes)
    • E-mail address:
      • Enter an appropriate address. The @domain.com should automatically be appended with whatever your Farm Administrator has setup on the server.
  3. Click OK.
You should be able to test your settings after this last step. For example, if you send an email to an Announcements list the subject line of the email should appear as the title of the announcement. The body of the email is the body of the announcement.

So there you have it. A very simple way of setting up your SharePoint lists to be updated via email.

Wednesday, February 6, 2013

Completely delete or remove a project from Team Foundation Server (TFS) 2010

Hello again -

Team Foundation Server (TFS) is designed not to permanently delete items you remove. Such as projects, branches, or even unused folders. It is a version control system for source code afterall. Though there is a way around this via command line if you are absolutely sure you want to remove those items.

I use a project here as an example. But you can really target anything. Simply by adjusting the path (URL) to the item. To delete a project completely from Team Foundation Server you will need to run the following command within your Administrator Visual Studio Command Prompt (2010).

TFSDeleteProject [/q] [/force] [/excludewss] /collection:<url> <team project name>

[/q] - Do not prompt for confirmation.

[/force] - Continue even if some data cannot be deleted.

[/excludewss] - Exclude the project's SharePoint® portal site when deleting the project. This option will leave site intact so that it remains for other projects that may be using it.

/collection:<url> - The url for a Team Project Collection.

<team project name> - The name of the project. Use quotes if there are spaces in the name.

Tuesday, February 5, 2013

How to install a self-signed certificate as a Trusted Root CA

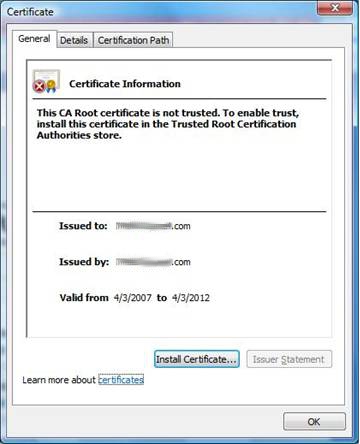
I'm sure there are other sources on the Internet for this task but, I wanted to provide what worked for me. Here are the basic instructions for installing a self-signed certificate into your trusted root Certification Authority (CA). These instructions were designed with Windows Vista or higher in mind. But, should suffice as a basic guideline for lower versions of Windows. Be absolutely sure you trust this certificate before doing this.

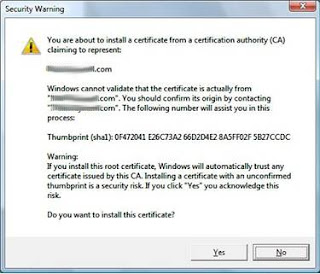
  1. When you get the security alert that "The identity of this web site or the integrity of this connection cannot be verified" you should see an option to View Certificate. Click on that.
  2. Next, click on Install Certificate....


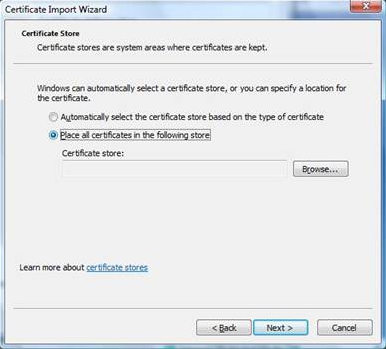
  3. Under the Certificate Import Wizard choose the option "Place all certificates in the following store" and select browse.


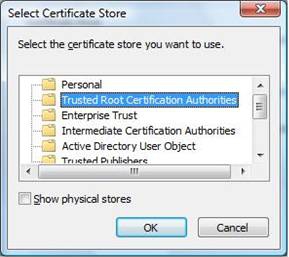
  4. Select Trusted Root Certification Authorities and click OK.


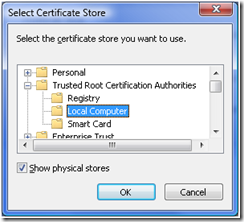
  5. Select Local Computer (some cases you have to select Show Physical Stores here). Click OK.


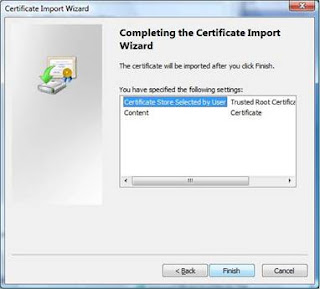
  6. Click Finish on the Completing the Certificate Import Wizard screen.


  7. Click yes on the warning message to install the certificate.


  8. Done!
You shouldn't be pestered by the alerts any longer for the certificate that you just installed. Remember though that these are only valid for the domain you are installing on. You can follow the same instructions for other domains though if needed.

What are Software Requirements?

Hello again. Good programmers have at least a basic understanding of project management. This includes project requirements. I'll attempt to explain below an example of what those requirements look like when you are dealing with a new software project.

Software Requirements are the elicitation, analysis, specification, and validation of requirements for software. A requirement itself is a singular documented physical and functional need that a particular solution or service must be or must perform.

The following information should always be provided when putting together proper software requirements within a software requirements specification (SRS) document.

Requirement Type The type of requirement.
Event / Use Cases List of events / use cases that need this requirement.
​Description Describe the requirement being requested within the project. Additional requirements should be inclusive of additional secondary headers (for table of contents tracking in documentation).
​Justification ​Describe the justification of the requirement.
Measurement Describe the measurement of the requirement such that it is possible to test if the solution matches the original requirement.
​Source Who raised this requirement?
​Customer Satisfaction ​Degree of stakeholder happiness if this requirement is successfully implemented. Scale from 1 = uninterested to 5 = extremely pleased.
​Customer Dissatisfaction ​Measure of stakeholder unhappiness if this requirement is not part of the final product. Scale from 1 = hardly matters to 5 = extremely displeased.
Dependencies A list of other requirements that have some dependency on this one.
Conflicts Other requirements that cannot be implemented if this one is.
Supporting Materials This is a pointer to documents that illustrate and explain this requirement

Branch Per Release vs. Code-Promotion Branching

Making for lost time on my blog here since I haven't posted in awhile. I wanted to give a clear picture between a "branch per release" approach to source code control. And, a "code-promotion branching" approach. For those unfamiliar with the two.

Branch Per Release

Development starts in the Main (or it is sometimes called the Trunk) branch. When a feature or change is requested a branch is created to the 1.0.0-Candidate (or sometimes the V1) branch. After a period of time, when the software is considered ready, it is built to the Test environment. It is then released into Production with the code in the final Production build getting a label to indicate which versions of which files were in that version. This is also known as "tagging". Once built into Production, a "tag" branch is created to the 1.0.0-Release.


Code-Promotion Branching

Development starts with just the Main branch. When the development team is ready to test the application with the business, it pushes the code to the Test branch. While the code is being tested, work on the next development version is carried out in the Main branch. If any fixes are required during testing, they can be developed on the Test branch and merged back into the Main branch for inclusion in the next release. Once the code is ready to release, it is branched again from Test to Production. When the next release cycle comes along, the same is done again. Changes are merged from Main to Test, then Test to Production.

Code-promotion branching works well in environments that have a single version running in Production, but have long test-validation cycles that do not involve all of the development team. This allows development to continue on the next version in Main while testing and stabilization of the build occurs in the Test branch. It also makes it trivial for the development team to look at the code currently on each system. Finally, the branch structure makes it easy to create an automated build and deployment system using Team Foundation Build ( http://msdn.microsoft.com/en-us/vstudio/ff637362.aspx ) that can automatically update the QA/Test environment as code is pushed to the QA branch.

I don't want people requesting access to my stuff!!!

I haven't posted in quite some time. So I figure it is time to get back into adding to my blog. To kick things off I am going to keep it pretty simple today. I'll explain how to enable / disable access requests.

Essentially, when it comes to access requests, SharePoint 2010 works in two ways. First, if you deny access to a site, list, library, or what not, the system will conceal (permission trim) that object from your view. Assuming it is within the same site collection. Second, if you deny access but have management of access requests turned on it gives the user the opportunity to request access. This is done via an email communication to the owner.

To enable or disable this feature (using a Site as the example here) simply do the following  accordingly:
  1. "Site Actions | Site Permissions"
  2. Under "Permission Tools | Edit" you will see a category called Manage.
  3. Click on Manage Access Requests.
  4. Uncheck the "Allow requests for access" option and click OK.
That's it. It is a pretty simple process. With this option you can easily manage those folks who may need access that you were unaware of.